Let's get started with Window Gellies because we can all use a splash of color on cold gray days! This activity engages you and your child, which allows for building memories along the way.
Here are your Window Gellie supply needs:
- one envelope of unflavored gelatin
- Three tablespoons of boiling water (adult part only)
- Three drops of food coloring
- measuring cups
- measuring spoons
- a small saucepan for boiling water or a tea kettle or a microwave
- plastic lids in a variety of sizes
- cake or aluminum pan
- drinking straws
First, adult boils and handles boiled water! Safety first, always! Empty your envelope of unflavored gelatin into a measuring cup and add the food coloring of your choice (primary and secondary color possibilities here) and (it's adult time now) the boiling water (again, adult boils and handles the boiled water).
Next, the adult stirs the ingredients until the gelatin dissolves fully. Put this up until out of reach of your child.
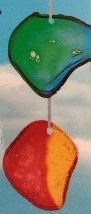
Next, together with your child, lay your plastic lids in the cake or aluminum pan. Carefully, (adult only), you will pour a little of the gelatin mixture into each plastic lid.
Then, let the gelatin dry for about one hour. The drying time is an opportunity to work together to wash and dry what you have already used, put away ingredients, and enjoy a snack or story together! Allow your child to be a part of the clean-up work cycle with you just as they are in our classrooms.
At the one-hour interval, you want to poke a hole in the gelatin shape for hanging in your window.
Tip: you may want to peel the gelatin shape out of the lid now. Or, if you prefer, you may let the shape dry for two days if your goal is teaching your child delayed gratification.
Note: if you remove the gelatin shapes on the same day, their dry shape will be more organic.